If you cannot find the answer to your question here, please contact us.

Frequently Asked Questions

Specifications

Yes, our valves are zero differential, unlike other manufacturers, Rancho Valves do not require pressure to operate (open or close). This is ideal for gravity fill applications such as Aboveground Storage Tanks (AST).

Yes, 878X Rancho Valve includes an internal pressure relief to help absorb thermal expansion in the fuel supply or transfer line.

All of the valves operate at their best performance with nominal voltage (the voltage stated in the nameplate/coil).

However, they all have a tolerance of approximately -/+ 10% of the nominal voltage.

Yes, as long as the maximum pressure is lower or the same as the maximum pressure stated on the nameplate the valve should work properly.

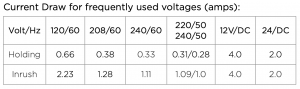
The current draw depends on the voltage and if it is a DC or AC power supply. Please keep in mind that when the power supply is AC the inrush current draw is approximately 3 times the holding current draw. 

Inrush is the initial current draw when the valve is energized, it is usually the first 1 to 3 seconds. After the valve fully opens the current draw drops to the holding stage.

The following table is for 3/4″ to 2″ valves (3″ valves draw approximately 60% more)

Installation

WARNING: To prevent the possibility of death, serious injury or property damage, check valve for proper operation before returning or putting to service. Also perform internal seat and external leakage tests with a nonhazardous, noncombustible fluid.

Yes, to be able to operate correctly, all solenoid valves must be installed with the arrow cast on the body pointing in the direction of flow. If the valve is installed backwards the fluid will pass through the valve even if it is in the close position.

Valve must be mounted on horizontal pipe with coil vertical and upright.

The PIPES on both sides of the valve must be HORIZONTAL and securely fastened install the valve with the COIL UPWARDS.

Tightening up always use counter-force when tightening up pipe connections, i.e. use a spanner on both the valve body as well as on the pipe connector.

The lead wires are 18″ long and are stranded. The wire gauge is 18 AWG.
The valve has two wires, either wire can be connected to the live or neutral supply in case of an AC coil or positive and negative in case of DC.

If the arrow on the valve is not pointing towards where the fluid should flow, then it is installed incorrectly, and the valve will let fluid flow backwards from the outlet to the inlet. The valve will not be damaged and you can correct the installation.

Maintenance

WARNING: To prevent the possibility of death, serious injury or property damage, turn off electrical power, depressurize valve, and vent fluid to a safe area before servicing the valve.

Rancho Valves require very little maintenance if a strainer is installed upstream of the valve and the fluid that it handles is clean of debris.

The only recommended maintenance is to thoroughly clean all parts (internal and external). If parts are worn or damaged, install a complete rebuild kit.

You can check the resistance of the coil with a tester. If there is no resistance or the resistance is almost zero, you need to replace the coil.

Coils last a long time (more than 140 thousand cycles), so if the coil is burnt out (no resistance) before reaching 140 thousand cycles, then there could be something wrong, such as not the right voltage applied, the piston inside the valve is stuck and does not move freely, fluid or ambient temperature too hot.

You can disassemble the bonnet of the valve by removing the coil and housing assembly, the 6 hex screws and the bonnet. The only part inside the valve is the piston assembly. Remove it and thoroughly clean it. Check for worn or damaged parts. If worn or damages, install a new piston assembly. Also clean the valve seat before replacing the piston.

The only joint of the valve is between the bonnet and the valve body. It seals with an o’ring.

You can disassemble the bonnet of the valve by removing the coil and housing assembly, and then the 6 hex screws. Lift the bonnet and inspect and replace the o’ring included in our rebuild kit.